
Opening the Case
Opening a PC case is a fundamental step in building or upgrading a computer. Different types of cases exist, each with unique mechanisms for access. Primarily, cases can be distinguished into mid-tower, full-tower, and mini-tower, as well as various form factors designed for specific needs. Understanding your case type is crucial as it can influence the opening method and overall assembly process.
Before beginning, it is essential to ensure that you have the necessary tools at hand. Generally, a Phillips head screwdriver is the most vital tool for opening a PC case. Some cases may also require a flathead screwdriver or special hex keys, depending on the design. Additionally, it is advisable to have a soft cloth or anti-static mat to place the case on to prevent scratches and provide a stable work surface.
Safety precautions are paramount when opening a PC case. First, ensure that the power supply is disconnected from the electrical outlet. Additionally, it is critical to ground yourself to prevent static discharge, which can harm delicate components inside. This can be achieved by using an anti-static wrist strap or touching a grounded metal object to dissipate static buildup. Once grounded, gently remove any screws or thumb screws securing the side panels of the case. Typically, most cases have either a hinged or sliding mechanism for opening the panels. Carefully remove these panels to gain access to the interior of the case.
In conclusion, taking the appropriate steps to safely open your PC case will facilitate a smoother building or upgrading experience. By understanding your case type, equipping yourself with the right tools, and adhering to safety measures, you will ensure that your components remain undamaged and your assembly process progresses efficiently.
Removing the Side Panels
To begin the process of assembling your PC, it is essential to remove the side panels of your PC case. This action not only provides access to the interior components but also facilitates easier installation and arrangement of hardware. The method of removal can vary slightly depending on the design of the case, so it is always prudent to consult the manufacturer’s manual for specific instructions.
The first step is to identify the screws securing the side panels. Typically, most PC cases will have screws located at the back, holding the left and right side panels in place. Using a suitable screwdriver, usually a Phillips head, carefully unscrew these from their positions. It is advisable to keep the screws in a designated container to avoid misplacement during the assembly process.
For cases equipped with a tool-less design, the side panels may feature sliding latches or buttons that can be easily released. To remove these panels, gently press or slide the mechanism, ensuring that no excessive force is applied, which could lead to breakage. After disengaging the locking mechanism, the panel should slide or lift off smoothly.
In the event your case has a lock mechanism, you will need to locate the key or use a suitable tool, like a flat screwdriver, to unlock it. Ensure that you handle this process with care to avoid damaging the lock itself. Once unlocked, proceed similarly as with the non-locked panels.
It is also beneficial to keep the case in a clean, static-free environment while performing these steps. By following these instructions diligently, you will successfully remove the side panels, paving the way for a streamlined assembly of your PC components.
Preparing the Case Interior
Before assembling your PC components, it is crucial to prepare the interior of the case adequately. This preparation involves cleaning and organizing to ensure optimal performance and airflow once your system is up and running. Begin by examining the interior of the case for any dust or debris. Dust accumulation can adversely affect the cooling capabilities of your components, leading to overheating issues down the road. Using a can of compressed air or a soft cloth can effectively remove dust from corners and crevices. Make sure to also check the fan areas for obstructions, as clear airflow is essential for maintaining a stable system.
Next, familiarize yourself with the layout of the case. Different cases come with various configurations, including specific placements for the motherboard, power supply, and storage drives. Understanding these layouts not only aids in assembly but also in planning for airflow management. For instance, SSDs and HDDs should be positioned strategically to enhance cable management and air circulation. Take some time to identify where you intend to place each component. Proper spacing will reduce the risk of overheating and facilitate future upgrades.
Moreover, it is vital to organize cables effectively. A cluttered interior can obstruct airflow, making it harder for fans to circulate air efficiently. Utilize case cable management features, such as tie-down points and routing channels, to keep cables neat and tidy. When assembling, connect power and data cables in a way that minimizes their visibility while allowing for easy access. This organized approach not only contributes to aesthetics but also ensures that maintenance and upgrades can be performed easily down the line.
By taking these steps to clean and prepare the interior of your case, you lay a solid foundation for building a high-performing and reliable PC. A systematic approach to checking for debris, understanding layout, and organizing cables will ultimately contribute to the overall success of your assembly process.
Installing the CPU: A Precise Process
Installing the CPU is a critical step in assembling your PC case, as it directly influences the system’s performance and stability. To begin, you must identify the correct CPU socket type on your motherboard. This is usually indicated in the motherboard manual or the manufacturer’s website. Common socket types include LGA (Land Grid Array) for Intel processors and AM4 for AMD processors. Ensuring compatibility between the CPU and motherboard is crucial; an incompatible socket will result in failure to install the CPU correctly.
Once you have verified compatibility, carefully remove the CPU from its packaging. Handle it by the edges to avoid touching the golden pins, as oils from your fingers can damage the component. Align the CPU over the socket on the motherboard, ensuring that the notches on the CPU match the corresponding pins in the socket. This step is vital, as improper alignment can lead to poor contact and potential damage to both the CPU and motherboard.
After aligning the CPU, gently lower it into the socket until it sits securely. Most sockets have a locking mechanism, which typically involves lifting a lever or sliding a bar to secure the CPU in place. Ensure that this mechanism is fully engaged to prevent the CPU from moving during operation. It is also essential to remember that applying pressure should be deliberate; avoid excessive force, which can bend the pins or damage the socket.
Common mistakes to avoid include forcing the CPU into the socket, which can result in damage, and forgetting to secure it properly. Additionally, avoid using thermal paste during this installation step; this will come later when attaching the cooler. Following these guidelines will help to ensure a successful CPU installation, setting a solid foundation for your PC build.
Applying Thermal Paste: Essential Techniques
Thermal paste plays a vital role in ensuring optimum heat transfer between the CPU and the heatsink, which is crucial for maintaining the performance of your computer. Without appropriate application of thermal paste, overheating can occur, leading to system instability and potentially damaging hardware components. Understanding the proper techniques for applying thermal paste can significantly impact your PC’s cooling efficiency.
First and foremost, it is essential to know the right amount of thermal paste to use. A common guideline is to apply a small, pea-sized dot of thermal paste in the center of the CPU’s surface. When the heatsink is affixed, the pressure will spread the paste evenly, filling any microscopic gaps that exist. Avoid applying too much paste, as this can lead to overflow, which may cause contamination and reduce thermal conductivity.
There are various methods for applying thermal paste, and selecting the right one can depend on personal preference. The dot method, as mentioned, is popular for its simplicity and effectiveness. Alternatively, the spread method involves using a plastic card or a dedicated spreader to create a thin layer across the CPU surface before placing the heatsink. This can provide a more uniform application, but it requires a steady hand to avoid introducing air bubbles, which can impair thermal performance.
Additionally, it is critical to avoid contamination during the application process. Make sure the CPU surface is clean and free from dust, oils, or residues. Consider using isopropyl alcohol and lint-free wipes for cleaning. When handling thermal paste, avoid contact with surfaces that may retain oils or dirt. Taking these precautions will ensure that your thermal paste creates an effective barrier necessary for efficient CPU cooling, ultimately contributing to the longevity and reliability of your system.
Positioning the Motherboard
Successfully positioning the motherboard is a vital step in the process of assembling a PC, as it establishes the foundation for all subsequent components. The motherboard typically comes with several mounting holes that align with standoffs pre-installed within the case. Begin by identifying these standoffs and aligning the motherboard so that each hole corresponds accurately with them. This ensures that the motherboard is properly supported and maintains a level position, which is critical for effective airflow and ease of access to the rear I/O ports.
Once aligned, the next step is to secure the motherboard using the appropriate screws. It is essential to use the correct screw size to avoid damaging the motherboard or the standoffs. As you fasten the screws, ensure that you do not overtighten them, which could warp the motherboard and lead to connectivity issues down the line. A gentle yet firm tightening will keep the motherboard securely in place while allowing it to expand during temperature changes without causing stress fractures.
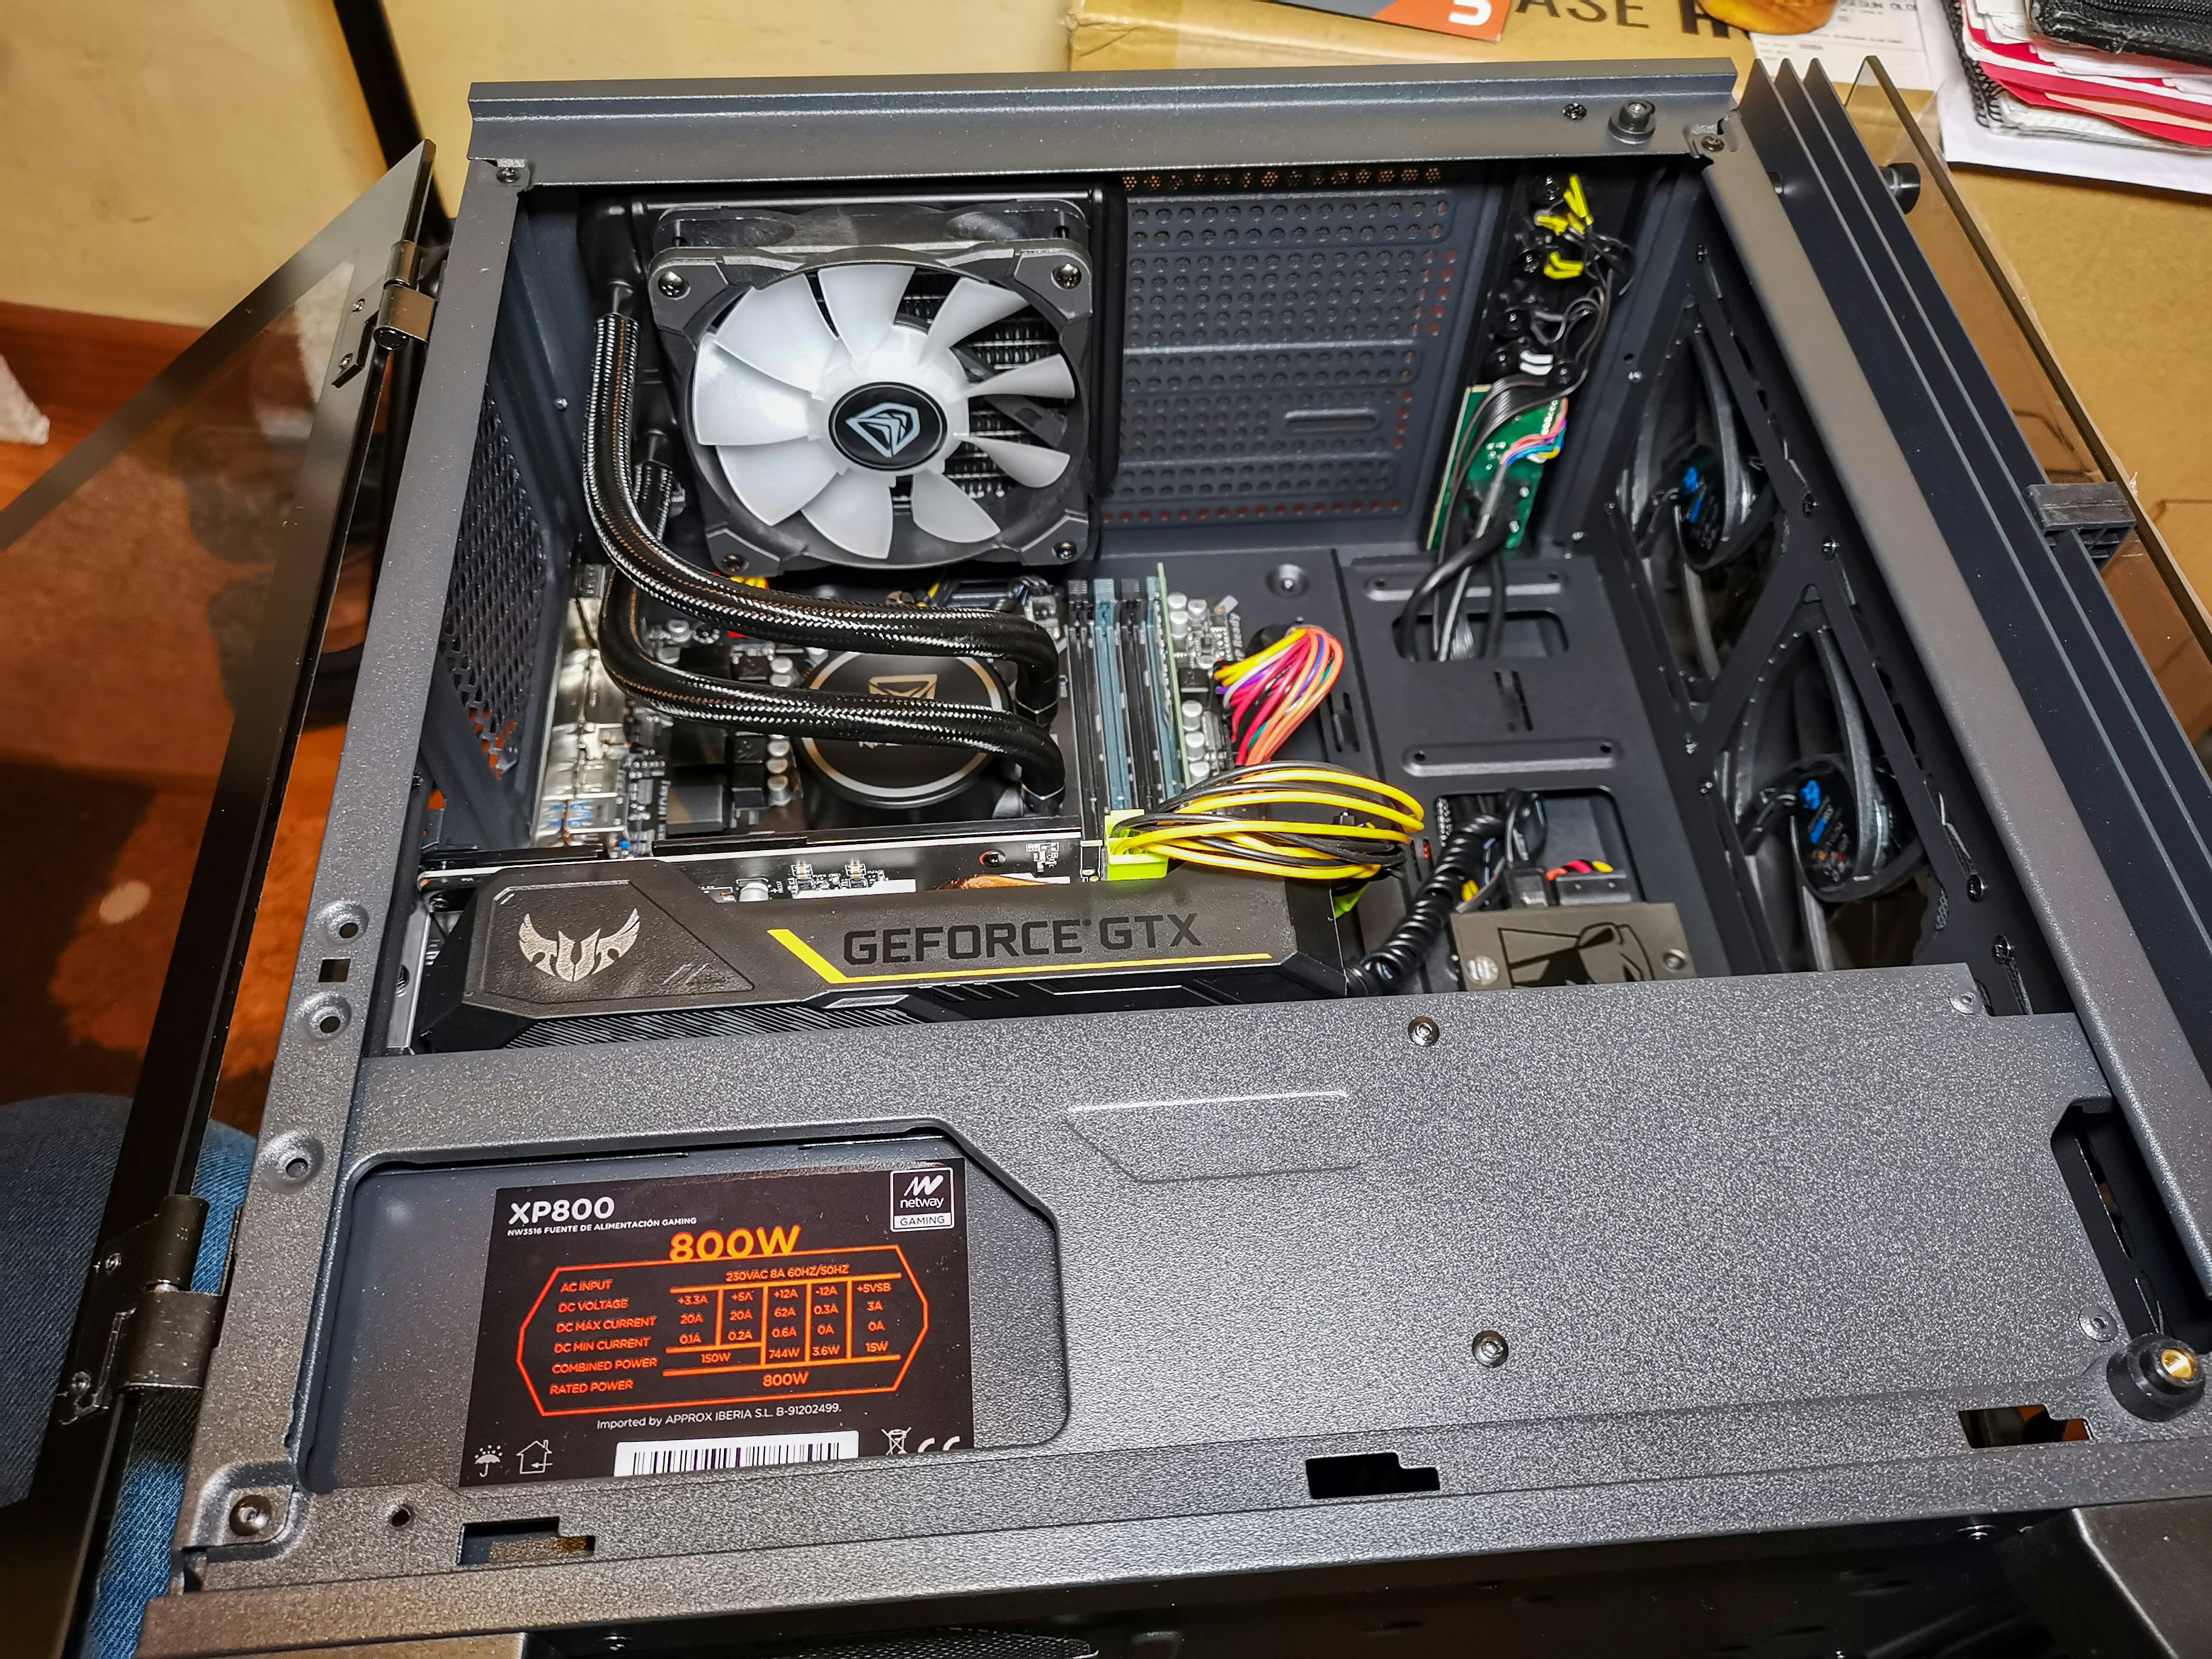
Additionally, proper cable management during this stage is crucial. Ensure that the power supply cables, including the 24-pin ATX connector and the CPU power connector, are routed in a manner that minimizes clutter and maximizes airflow in the case. Neatly arranging these cables can significantly improve airflow, which is vital for maintaining optimal temperatures in your PC. Furthermore, good cable management facilitates easier upgrades and maintenance in the future.
In conclusion, correct positioning of the motherboard within the case not only supports the component but also plays a significant role in overall system performance and accessibility. By aligning the motherboard with the standoffs and addressing cable management, you establish a strong foundation for the remaining components of your PC build.
Managing Cables and Connections
Effective cable management is a critical aspect of assembling your PC case. Not only does it improve airflow, enhancing thermal performance, but it also contributes to the overall aesthetics of the build. When cables are neatly organized, the interior of the PC can look more professional and tidy, which is appealing not just visually, but also functionally. A cluttered space can obstruct cooling components and create a less efficient working environment.
To begin with, consider the layout of your case. Most cases feature designated pathways and mounting points for cables. Utilize these areas to your advantage by routing cables through the back panel. This technique keeps excess wires hidden, reducing clutter in the visible area. Moreover, it prevents cables from interfering with airflow, which is essential for maintaining optimal operating temperatures within your system.
When connecting components such as the motherboard, power supply, and drives, it is advisable to employ zip ties or Velcro straps to secure cables in place. This not only helps in organizing the cables but also reduces the risk of them being subject to wear and tear over time. Additionally, you can opt for cable sleeves or cable combs for a polished appearance that elevates the visual quality of the build.
Another excellent practice is to group cables by their purpose. For instance, separate power cables from data cables, creating sections for each to make troubleshooting easier later on. Labeling cables can also expedite identification during maintenance or upgrades, providing a streamlined approach to your setup.
In summary, practicing meticulous cable management enhances both airflow and aesthetic appeal, contributing to the overall efficiency and attractiveness of your PC assembly. By implementing thoughtful organization techniques, you can ensure your build remains tidy and functional.
Finalizing the Assembly Steps
After having meticulously assembled the various components of your PC, it is essential to finalize the assembly process by taking a few critical steps to ensure everything is in order. The first step in this concluding phase is to carefully reinstall the side panels of the case. This action not only enhances the aesthetics of the PC but also provides necessary protection to the internal components. Make sure that any screws or latches are securely fastened to prevent dust buildup and accidental disturbances during operation.
Next, it is advisable to double-check all connections. This includes verifying that all power cables from the power supply are firmly connected to their respective components such as the motherboard, GPU, and storage devices. A slight oversight can lead to operational inconsistencies and issues at startup. Additionally, ensure that all peripheral connections, including USB ports and audio jacks, are correctly installed.
After confirming the connections, examine the placement of the components within the case to guarantee they are secure. Loose components can cause system instability and even physical damage during movement. Look out for any cable management concerns; organize and tie down stray cables to enable efficient airflow within the case, which is pivotal for cooling.
To assist in this finalization process, a checklist can be particularly beneficial. Listing each completed step, such as component installation, cable management, and securing panels, provides a clear overview of the assembly process. Review this checklist thoroughly to ensure that you have not overlooked any vital steps. Completing these final steps will not only prepare your PC for use but will also enhance its longevity by ensuring all components are protected and functioning optimally.
Testing and Troubleshooting
Upon completing the assembly of your PC case, the next significant step involves powering it on for the first time. This moment can be both exciting and nerve-wracking, as it signifies the culmination of your efforts. Before turning on your PC, ensure that all connections, including the power supply, motherboard, and peripherals, are securely fitted. Double-check that all components are installed correctly, and that the power supply switch (if applicable) is in the “on” position.
When you power on your PC, listen for fans whirring or lights illuminating on the motherboard and components. These initial signals are positive indicators that power is reaching your system. If the computer fails to power on, this could be due to several issues. Firstly, confirm that the power supply unit is functioning correctly. It is advisable to test it using a power supply tester or substituting it with a known working unit. Next, inspect the motherboard connections again; improper connections can often lead to no power condition.
If the system powers on but there is no display, check to ensure that the monitor is properly connected to the graphics card, and that it is powered on. If using an integrated graphics setup, ensure that the monitor is connected to the correct output on the motherboard. If both power and display issues persist, re-examine RAM installation, as improperly seated memory modules can prevent the system from booting. Lastly, consult the motherboard manual for any diagnostic lights or beep codes that may provide further insights into the problem.
Testing and troubleshooting after the assembly of your PC are crucial steps to ensure optimal performance and enjoyment of your new system. Taking the time to methodically check connections and components will save you from potential frustration, allowing you to savor the successful culmination of your PC-building experience.